https://youtu.be/cnE_VuCHLG4 this is my first personal mod menu project. stay tuned for public release Creator Channel https://www.youtube.com/user/DanialADH2013 Creator Twitter https://twitter.com/DanialADH TAGS: (IGNORE) tutorial, mobile, legends, kill, hack, mobile legends, mobile legends hack, free, game, tips, review, cheat, ranked, mobile legends diamonds hack, mobile legends free diamonds, glitch, mobile legends bang bang, google, gameplay, to, battle, mvp, dc legends hack, touch, how, droid, vip, fire emblem heroes hack, games, how to hack mobile legends, guide, dc legends free gems, jogos, hackear, phone, attack, new, unlimited, rp hack, hacks, level, online, como, hero, how to, units, public
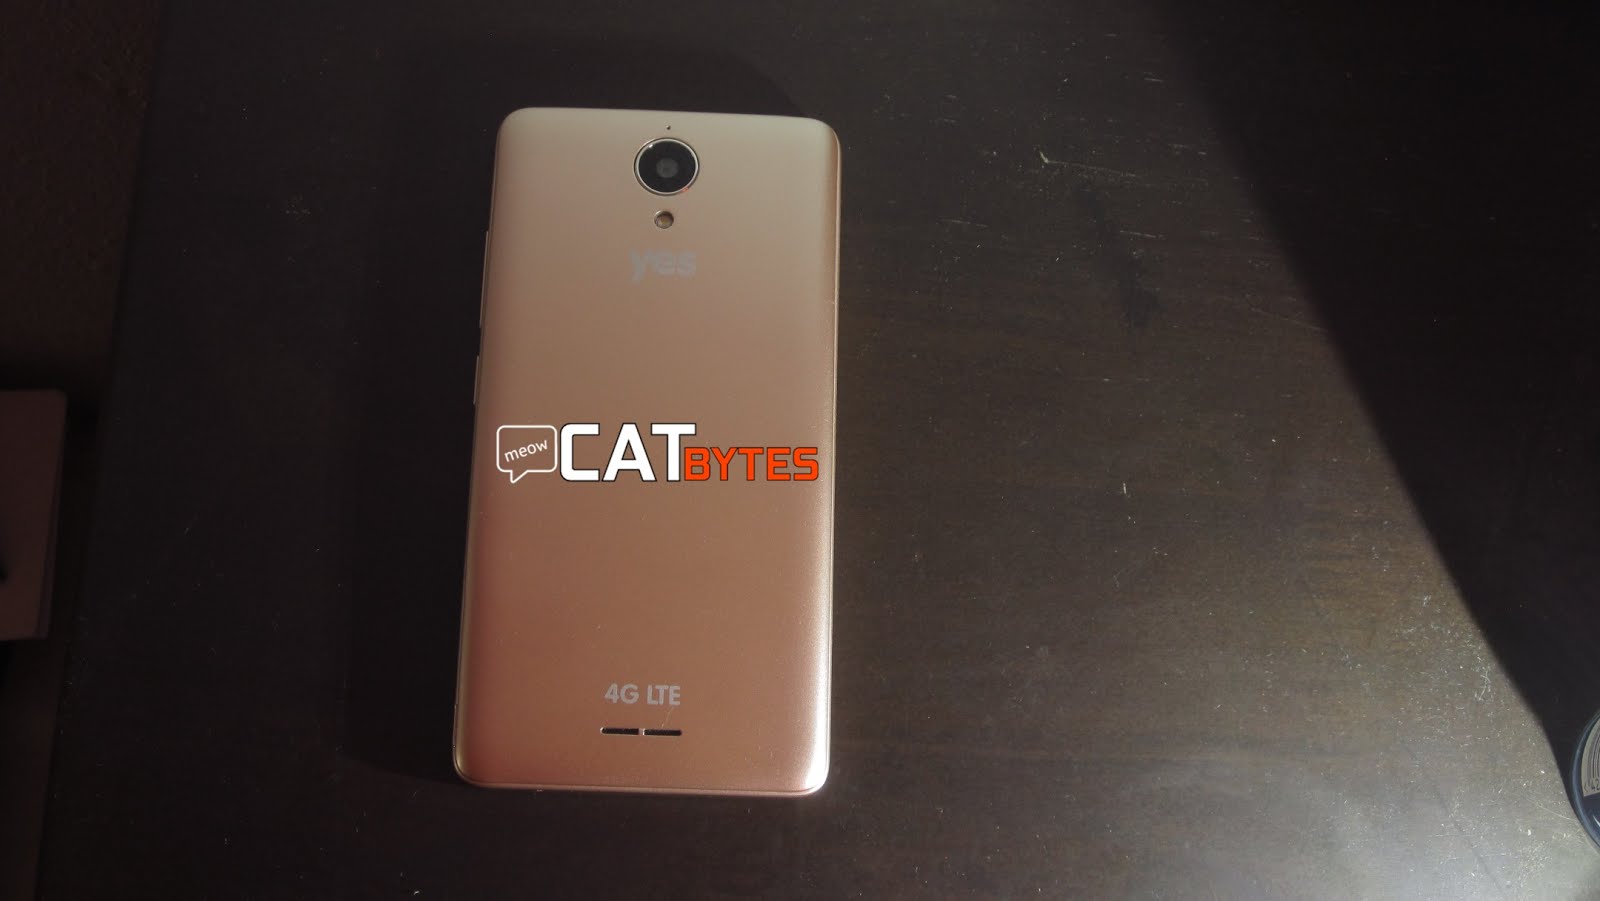
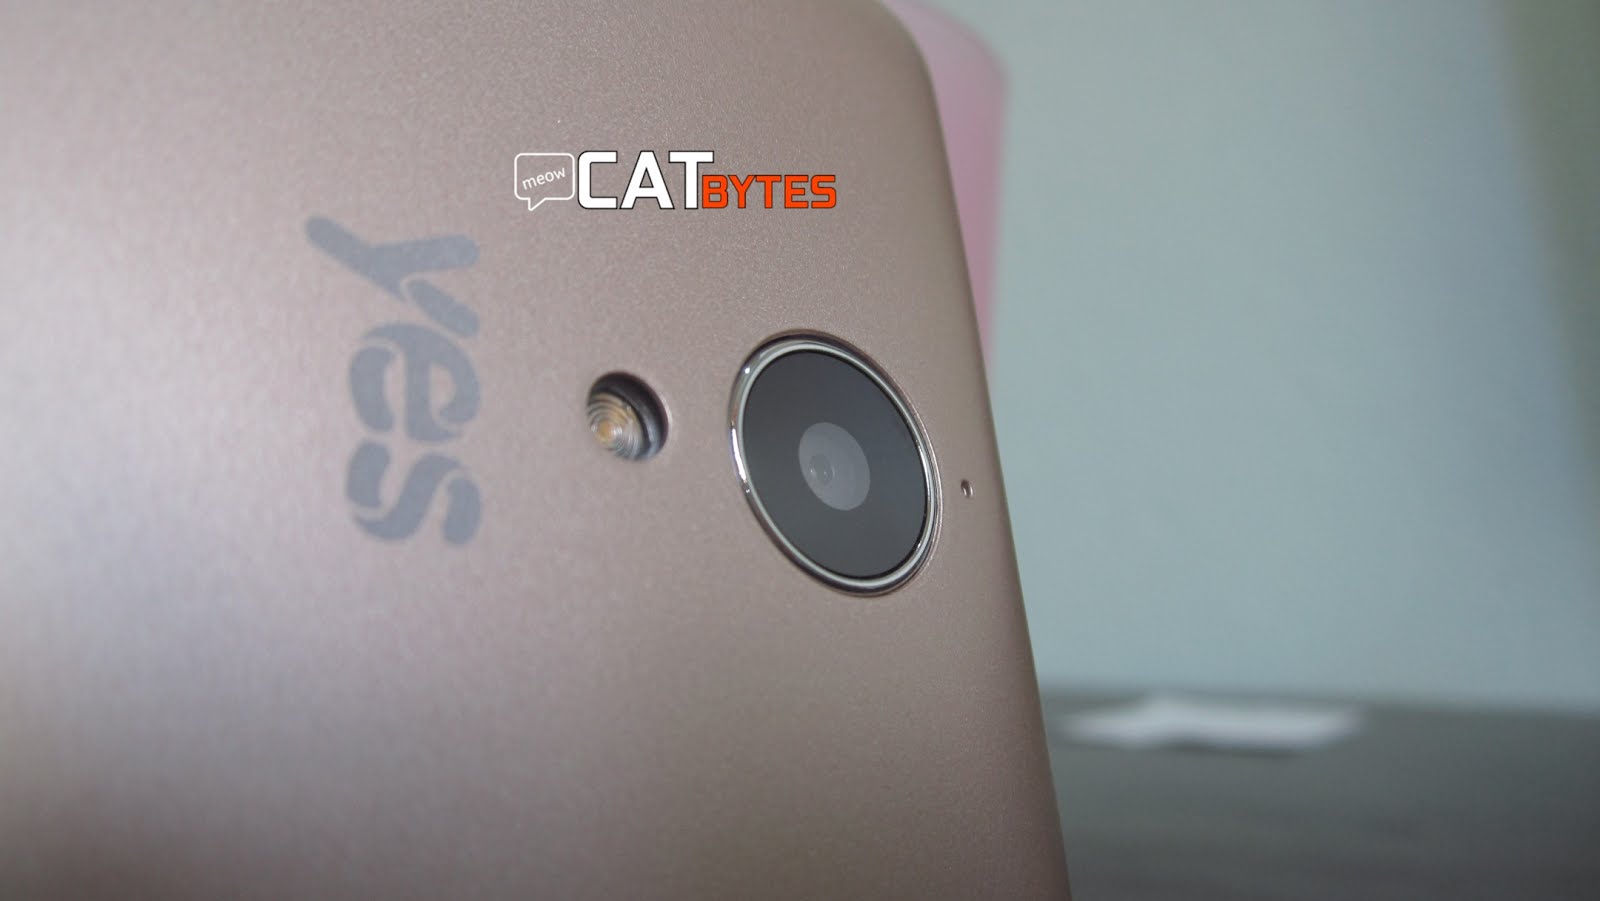
Reach Greater Heights with Yes Altitude 4G LTE Smartphone
Its specifications are in-line with our expectations: A Qualcomm MSM8916 chipset with a Quad-core 1.0GHz processor, 1GB of RAM, 8GB of storage (expandable to 32GB), a 5-inch HD IPS On-Cell Display, and a sizeable 2,300mAh removable battery.
By completing this walkthrough, you’ll become familiar with many of the tools, dialog boxes, and designers that you can use when you develop applications with Visual Studio. You’ll create a simple “Hello, World”-style application, design the UI, add code, and debug errors, while you learn more about working in the integrated development environment (IDE).
This walkthrough is based on Visual Studio Professional, which offers the WPF Application template on which you'll build the project for this walkthrough. Visual Studio Express for Windows Desktop also offers that template, but Visual Studio Express for Windows and Visual Studio Express for Web don't. For introductory information about how to use Visual Studio Express for Windows, see the Developer Center for Windows Store apps. For introductory information about how to use Visual Studio Express for Web, see Get Started with ASP.NET. In addition, your edition of Visual Studio and the settings that you use determine the names and locations of some elements of the user interface. See Customizing Development Settings in Visual Studio.
When you start Visual Studio for the first time, Visual Studio prompts you to sign in with a Microsoft Service Account (MSA), Sign into Visual Studio. You do not need to sign in and can do that later.
On your Visual Studio launch, you next must choose a settings combination that applies a set of pre-defined customizations to the IDE. Each settings combination has been designed to make it easier for you to develop applications.
This walkthrough assume you applied General Development Settings, which applies the least amount of customization to the IDE. If you have already chosen C# or Visual Basic (both are good choices), you don’t have to change your settings. If you want to change your settings, you can use the Import and Export Settings Wizard. See Customizing Development Settings in Visual Studio.
After you open Visual Studio, you can identify the tool windows, the menus and toolbars, and the main window space. Tool windows are docked on the left and right sides of the application window, with Quick Launch, the menu bar, and the standard toolbar at the top. In the center of the application window is the Start Page. When you load a solution or project, editors and designers appear in the space where the Start Page is. When you develop an application, you’ll spend most of your time in this central area.
Figure 2: Visual Studio IDE
You can make additional customizations to Visual Studio, such as changing the font face and size of the text in the editor or the color theme of the IDE, by using the Options dialog box. Depending on the settings combination that you’ve applied, some items in that dialog box might not appear automatically. You can make sure that all possible options appear by choosing the Show all settings check box.
Figure 3: Options dialog box
In this example, you’ll change the color theme of the IDE from light to dark. You can skip ahead to create a project if you like.
To change the color theme of the IDE
Open the Options dialog box by choosing the Tools menu at the top and then the Options … item.
Change the Color theme to Dark, then click OK.
The colors in Visual Studio should match the following image:
When you create an application in Visual Studio, you first create a project and a solution. For this example, you’ll create a Windows Presentation Foundation (WPF) project.
To create the WPF project
Create a new project. On the menu bar, choose File, New, Project….
You can also type New Project in the Quick Launch box to do the same thing.
Choose the Visual Basic or the Visual C# WPF Application template by choosing in the left pane Installed, Templates, Visual C#, Windows, for example, and then choosing WPF Application in the middle pane. Name the project HelloWPFApp at the bottom of the New Project dialog.
OR
Visual Studio creates the HelloWPFApp project and solution, and the Solution Explorer shows the various files. The WPF Designer shows a design view and an XAML view of MainWindow.xaml in a split view. You can slide the splitter to show more or less of either view. You can choose to see only the visual view or only the XAML view. (For more information, see WPF Designer for Windows Forms Developers). The following items appear in Solution Explorer:
Figure 5: Project items
After you create the project, you can customize it. By using the Properties window (found on the View menu), you can display and change options for project items, controls, and other items in an application. By using the project properties and property pages, you can display and change options for projects and solutions.
To change the name of MainWindow.xaml
In the following procedure, you’ll give MainWindow a more specific name. In Solution Explorer, select MainWindow.xaml. You should see the Properties window, but if you don’t, choose the View menu and the Property Window item. Change the File Name property toGreetings.xaml.
Solution Explorer shows that the name of the file is now Greetings.xaml, and if you expand the MainWindow.xaml node (by putting focus in the node and pressing the rightarrow key), you see the name of MainWindow.xaml.vb or MainWindow.xaml.cs is now Greetings.xaml.vb or Greetings.xaml.cs. This code file is nested under the .xaml file node to show they are very closely related to each other.
Warning
This change causes an error that you will learn how to debug and fix in a later step.
In Solution Explorer, open Greetings.xaml in the Designer view (by pressing the Enter key while the node has focus) and select the title bar of the window by using the mouse.
In the Properties window, change the value of the Title property to Greetings.
The title bar for MainWindow.xaml now reads Greetings.
We will add three types of controls to this application: a TextBlock control, two RadioButton controls, and a Button control.
To add a TextBlock control
Open the Toolbox window by choosing the View menu and the Toolbox item.
In the Toolbox, search for the TextBlock control.
Add a TextBlock control to the design surface by choosing the TextBlock item and dragging it to the window on the design surface. Center the control near the top of the window.
Your window should resemble the following illustration:
Figure 7: Greetings window with TextBlock control
The XAML markup should look something like the following:
In the XAML view, locate the markup for TextBlock and change the Text attribute: Text=”Select a message option and then choose the Display button.”
If the TextBlock does not expand to fit the In the Design view, enlarge the TextBlock control (using the grab handles on the edges) so that it displays all the text.
Save your changes by pressing Ctrl-s or using the File menu item.
Next, you’ll add two RadioButton controls to the form.
To add radio buttons
In the Toolbox, search for the RadioButton control.
Add two RadioButton controls to the design surface by choosing the RadioButton item and dragging it to the window on the design surface twice, and move the buttons (by selecting them and using the arrow keys) so that the buttons appear side by side under the TextBlock control.
Your window should look like this:
Figure 8: RadioButtons in the Greetings window.
In the Properties window for the left RadioButton control, change the Name property (the property at the top of the Properties window) to RadioButton1. Make sure you have selected the RadioButton and not the background Grid on the form; the Type field of the Property Window under the Name field should say RadioButton.
In the Properties window for the right RadioButton control, change the Name property to RadioButton2, and then save your changes by pressing Ctrl-s or using the File menu item. Make sure you selected the RadioButton before changing and saving.
You can now add display text for each RadioButton control. The following procedure updates the Content property for a RadioButton control.
To add display text for each radio button
On the design surface, open the shortcut menu for RadioButton1 by pressing the right mouse button while selecting RadioButton1, chooseEdit Text, and then enter Hello.
Open the shortcut menu for RadioButton2 by pressing the right mouse button while selecting RadioButton2, choose Edit Text, and then enter Goodbye.
The final UI element that you’ll add is a Button control.
To add the button control
In the Toolbox, search for the Button control, and then add it to the design surface under the RadioButton controls by selecting Button and dragging it to the form in the design view.
In the XAML view, change the value of Content for the Button control from Content=”Button” to Content=”Display”, and then save the changes (Ctrl-s or use the File menu).
The markup should resemble the following example: <Button Content="Display" HorizontalAlignment="Left" VerticalAlignment="Top" Width="75" Margin="215,204,0,0"/>
Your window should resemble the following illustration.
When this application runs, a message box appears after a user first chooses a radio button and then chooses the Display button. One message box will appear for Hello, and another will appear for Goodbye. To create this behavior, you’ll add code to the Button_Click event in Greetings.xaml.vb or Greetings.xaml.cs.
Add code to display message boxes
On the design surface, double-click the Display button.
Greetings.xaml.vb or Greetings.xaml.cs opens, with the cursor in the Button_Click event. You can also add a click event handler as follows (if the pasted code has a red squiggle under any names, then you probably did not select the RadioButton controls on the design surface and rename them):
For Visual Basic, the event handler should look like this:
Next, you’ll debug the application to look for errors and test that both message boxes appear correctly. The following instructions tell you how to build and launch the debugger, but later you might read Building a WPF Application (WPF) and Debugging WPF for more information.
In this step, you’ll find the error that we caused earlier by changing the name of the main window XAML file.
To start debugging and find the error
Start the debugger by selecting Debug, then Start Debugging.
A dialog box appears, indicating that an IOException has occurred: Cannot locate resource ‘mainwindow.xaml’.
Choose the OK button, and then stop the debugger.
We renamed Mainwindow.xaml to Greetings.xaml at the start of this walkthrough, but the code still refers to Mainwindow.xaml as the startup URI for the application, so the project can't start.
To specify Greetings.xaml as the startup URI
In Solution Explorer, open the App.xaml file (in the C# project) or the Application.xaml file (in the Visual Basic project) in the XAML view (it cannot be opened in the Design view) by selecting the file and pressing Enter or by double clicking it.
Change StartupUri="MainWindow.xaml" to StartupUri="Greetings.xaml", and then save the changes with Ctrl-s.
Start the debugger again (press F5). You should see the Greetings window of the application.
By adding some breakpoints, you can test the code during debugging. You can add breakpoints by choosing Debug on the main menu, thenToggle Breakpoint or by clicking in the left margin of the editor next to the line of code where you want the break to occur.
To add breakpoints
Open Greetings.xaml.vb or Greetings.xaml.cs, and select the following line: MessageBox.Show("Hello.")
Add a breakpoint from the menu by selecting Debug, then Toggle Breakpoint.
A red circle appears next to the line of code in the far left margin of the editor window.
Select the following line: MessageBox.Show("Goodbye.").
Press the F9 key to add a breakpoint, and then press the F5 key to start debugging.
In the Greetings window, choose the Hello radio button, and then choose the Display button.
The line MessageBox.Show("Hello.") is highlighted in yellow. At the bottom of the IDE, the Autos, Locals, and Watch windows are docked together on the left side, and the Call Stack, Breakpoints, Command, Immediate, and Output windows are docked together on the right side.
On the menu bar, choose Debug, Step Out.
The application resumes execution, and a message box with the word “Hello” appears.
Choose the OK button on the message box to close it.
In the Greetings window, choose the Goodbye radio button, and then choose the Display button.
The line MessageBox.Show("Goodbye.") is highlighted in yellow.
Choose the F5 key to continue debugging. When the message box appears, choose the OK button on the message box to close it.
Press the SHIFT + F5 keys (press shift first, and while holding it down, press F5) to stop debugging.
On the menu bar, choose Debug, Disable All Breakpoints.
Now that you’ve verified that everything works, you can prepare a release build of the application.
To clean the solution files and build a release version
On the main menu, select Build, then Clean solution to delete intermediate files and output files that were created during previous builds. This is not necessary, but it cleans up the debug build outputs.
Change the build configuration for HelloWPFApp from Debug to Release by using the dropdown control on the toolbar (it says “Debug” currently).
Build the solution by choosing Build, then Build Solution or press the F6 key.
Congratulations on completing this walkthrough! You can find the .exe you built under your solution and project directory (…\HelloWPFApp\HelloWPFApp\bin\Release\). If you want to explore more examples, see Visual Studio Samples.
Micron’s GDDR5X memory explored – could this be what Nvidia’s mid end will look like in 2016?
Lets start with the preliminaries, what exactly is GDDR5X? Ironically, this question has not been answered very clearly by Micron itself and details are very vague in nature. This is what we do know however: GDDR5X is based on the GDDR5 standard and primarily doubles the prefetch of the standard while preserving “most of the command protocols of GDDR5”. What that means is that while the bandwidth has been doubled, it is not, strictly speaking an improvement of the GDDR5 standard, rather a new branch of the same and arguably a completely new technology (contrary to what the ‘GDDR’X name might suggest). One of the examples given is DDR3 to DDR4, which also happens to be a good approximate analogy to think of the GDDR5 to GDDR5X jump.
Also, contrary to what has been reported in the past by some sources, the Micron GDDR5X standard is not proprietary in nature, infact JEDEC has been approached (by Micron) to make it a universal standard. Given below is the only ‘technical slide’ released by Micron so far:
We can immediately see that as opposed to a 32 Bit wide memory access, the GDDR5X supports 64 Bit wide (double the prefetch) memory access, theoretically doubling the memory bandwidth. Keep in mind however that voltages will remain exactly the same. Although the foot print or the real estate taken by the memory (something which was one of the problems associated with GDDR5), on the card itself, will halve in size – thanks to the fact that Micron has managed to double the density of GDDR5. The company is expected to make a formal announcement in 2016 – with availabliity of the standard in 2016 as well. So the question then becomes, will Nvidia use GDDR5X in their upcoming line of GPUs (Pascal and beyond)?
Before we answer that, lets look a bit at the numbers of GDDR5 and GDDR5X.
The bandwidth of GDDR5 can be computed via the following method:
[DDR Clock Speed]*[2]*[Bus Width/8] *this is the same clock speed shown on popular OC tools such as MSI After burner. ** All calculations given below assume the same umber of GDDR5 or GDDR5X chips.
This means that the GTX 980 Ti, which reads 3505 Mhz (7010 Mhz effective) has a theoretical bandwidth of [7010*384/8=>] ~336 GB/s.
An extract from Micron’s nomenclature documentation. @Micron
Now while we don’t know any other details abut GDDR5X, I was able to find this pdf on Micron’s website which sheds some interesting details; details that we can use to estimate speed and performance of this particular piece of technology. Thanks to the PDF, we know that the real clock rates of the memory will be the same. And if Micron’s claim is true than all we need to do is add a x2 multiplier. The equation for GDDR5X would therefore become:
[DDR Clock Speed]*[4]*[Bus Width/8]
Please note that the document lists the “real” clock speed and not the DDR clock speed. To change that into the DDR clock speed we will initially multiply the value by 2. So for a chip with a DDR clock rate of 3505 Mhz we will get the following bandwidth:
[3505*4*384/8=>] ~673 GB/s
Now if you remember the original leak, the numbers it stated for GDDR5X was a ‘256 bit bus width with 7000 Mhz (DDR) clock rate and the actual achieved bandwidth being 448 GB/s’. And consequently, we now have a metric to ascertain whether or not the rumor has even the slightest grain of authenticity. Now the folks over at 3DCentre have included the x2 multiple in the DDR clock rate, which might (or might not) be a technical inaccuracy since the real clock rates remain the same (only the ‘effective’ clock rate would change). To get the 448 GB/s number, we are actually assuming a 256 bit wide bus width and a DDR clock rate of 3500 Mhz:
[3500*4*256/8=>] ~448 GB/s
This is pretty close to the 512 GB/s number that HBM1 currently gives. Ofcourse, HBM2 is a whole other ball game and runs circles around the performance advantages offered by GDDR5X. So is this memory standard dead on arrival? Unfortunately, once again, we do not have enough information to categorically answer that question since we are missing several key points. More information on this will be shed in 2016 according to the press release.
Now micron has stated and implied that they avoided creating a brand new standard from the gorund up and instead workied on the GDDR5 standard. They also claim that most of the command protocols have been preserved. However, the most critical question is if the interface itself is the same as GDDR5. To put that into perspective here are some things we feel very confident saying:
High Bandwidth Memory (HBM) is the memory standard of the future and the low clocks plus low power consumption makes it ideal for every form of compute.
Micron’s GDDR5 is not going to offer a lower power solution that HBM.
Nvidia is most definitely going to use HBM in its higher end offerings.
Nvidia might decide to swap GDDR5 with GDDR5X on its Mid-End offerings if (and only if) the switching costs (in terms of yield, sampling and development) are not significant. If they are significant, or if initial sampling isn’t high, then Nvidia will simply not bother switching to GDDR5X and just switch directly to HBM2 when it achieves economies of scale.
Micron’s GDDR5 will offer double the bandwidth capability and twice the memory density, with availability in 2016.
This is why it matters a lot whether or not GDDR5X is sufficiently similar to GDDR5 like its name suggests. Nvidia will undoubtedly have offerings next generation which run on GDDR5 so it would make sense to swap the GDDR5 on them with GDDR5X, but only and only if the switching cost is marginal.If GDDR5X is a standard that requires significant development costs before adaptation then it is very unlikely (more like impossible) that Nvidia shifts to this standard.
Another point to note is that graphics processors (and almost every other processor) are years in the making and if Micron has truly just developed this memory (their press release seems to support this fact) then Nvidia will simply not have the choice to switch to them since GPUs would already be in the fabrication stage at TSMC. The only way this can even happen is if we are to assume that Micron had approached Nvidia long time ago and the news about this standard is just becoming public.
And since we are now entering the domain of sheer speculation, I would end on this note:Nvidia’s use of GDDR5X is a possibility, but not a probability as far as I can see (for high end chips). Micron wasn’t very explicit about it, but I have a feeling that the switching costs (or the sampling) will not be feasible for use in 2016. And considering that HBM will soon achieve economies of scale, it seems a pointless thing to follow after, unless ofcourse, it takes nothing (for Nvidia) to adopt this standard.
Now that the smoke have settled and people have discussed performance back and forth and what they expected, and wether they are happy or disappointed, think about this:
GTX 980Ti and Titan X have the biggest chip Nvidia have ever created. Its 600mm2 in total size and its absolutely massive. It was made because Nvidia had no node shrink to manufacture their new chips and they were stuck on 28nm. So they went up in size from their comfort zone because it was the only way of getting more performance by increasing chip size to get more transistors in to it.
GTX 580 was 520mm2 and was beaten by 300mm2 GTX 680 by 25%.
Now we will have a ~310mm2 GTX 1080 beating a 600mm2 GTX Titan X by ~25%.
There is a lot of transistors to overcome on the GM200 with a much smaller GP104 GPU. And at the same time Nvidia have manged to reduce TDP down to 180W which is even smaller than GTX 680`s 195W.
Huang said they spent billion of dollars to engineer the cards and several thousands of engineers working on it. I think we should acknowledge what a great result they have come up with.
HERE IS THE ARTICLE
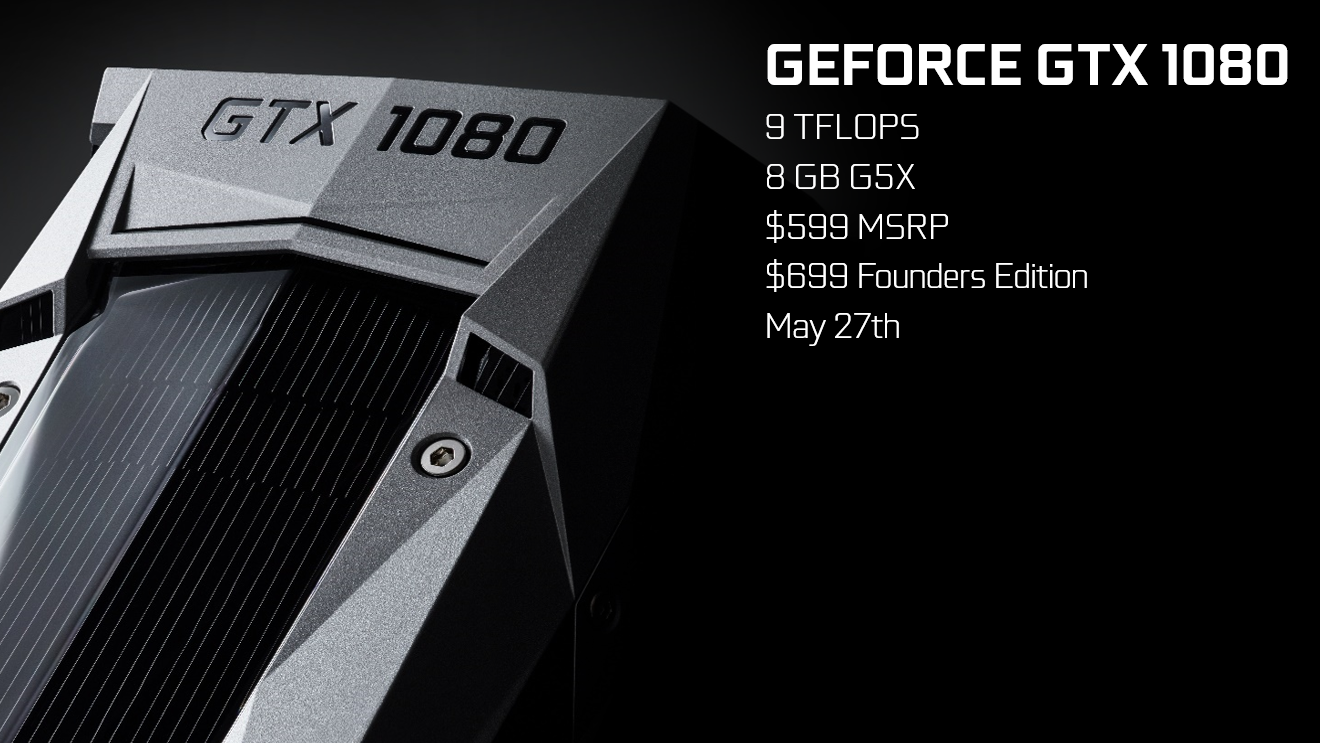
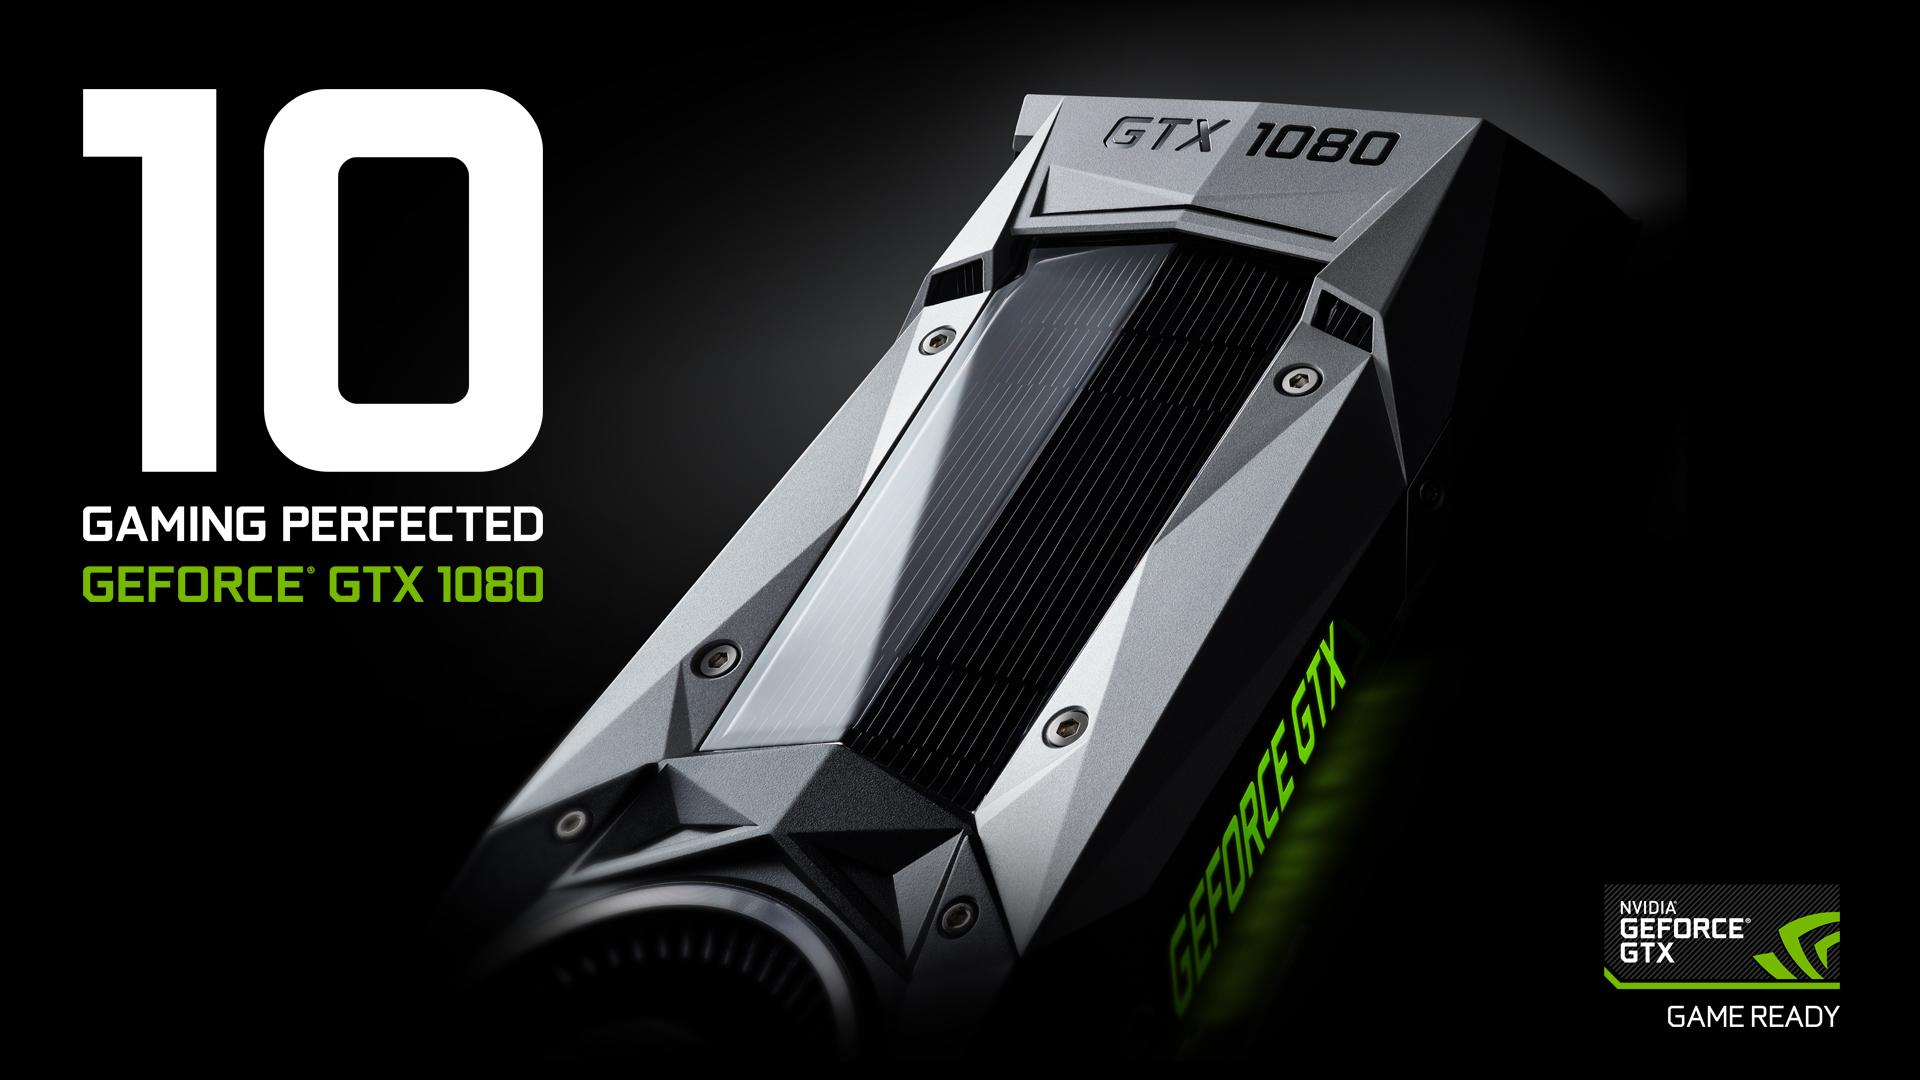
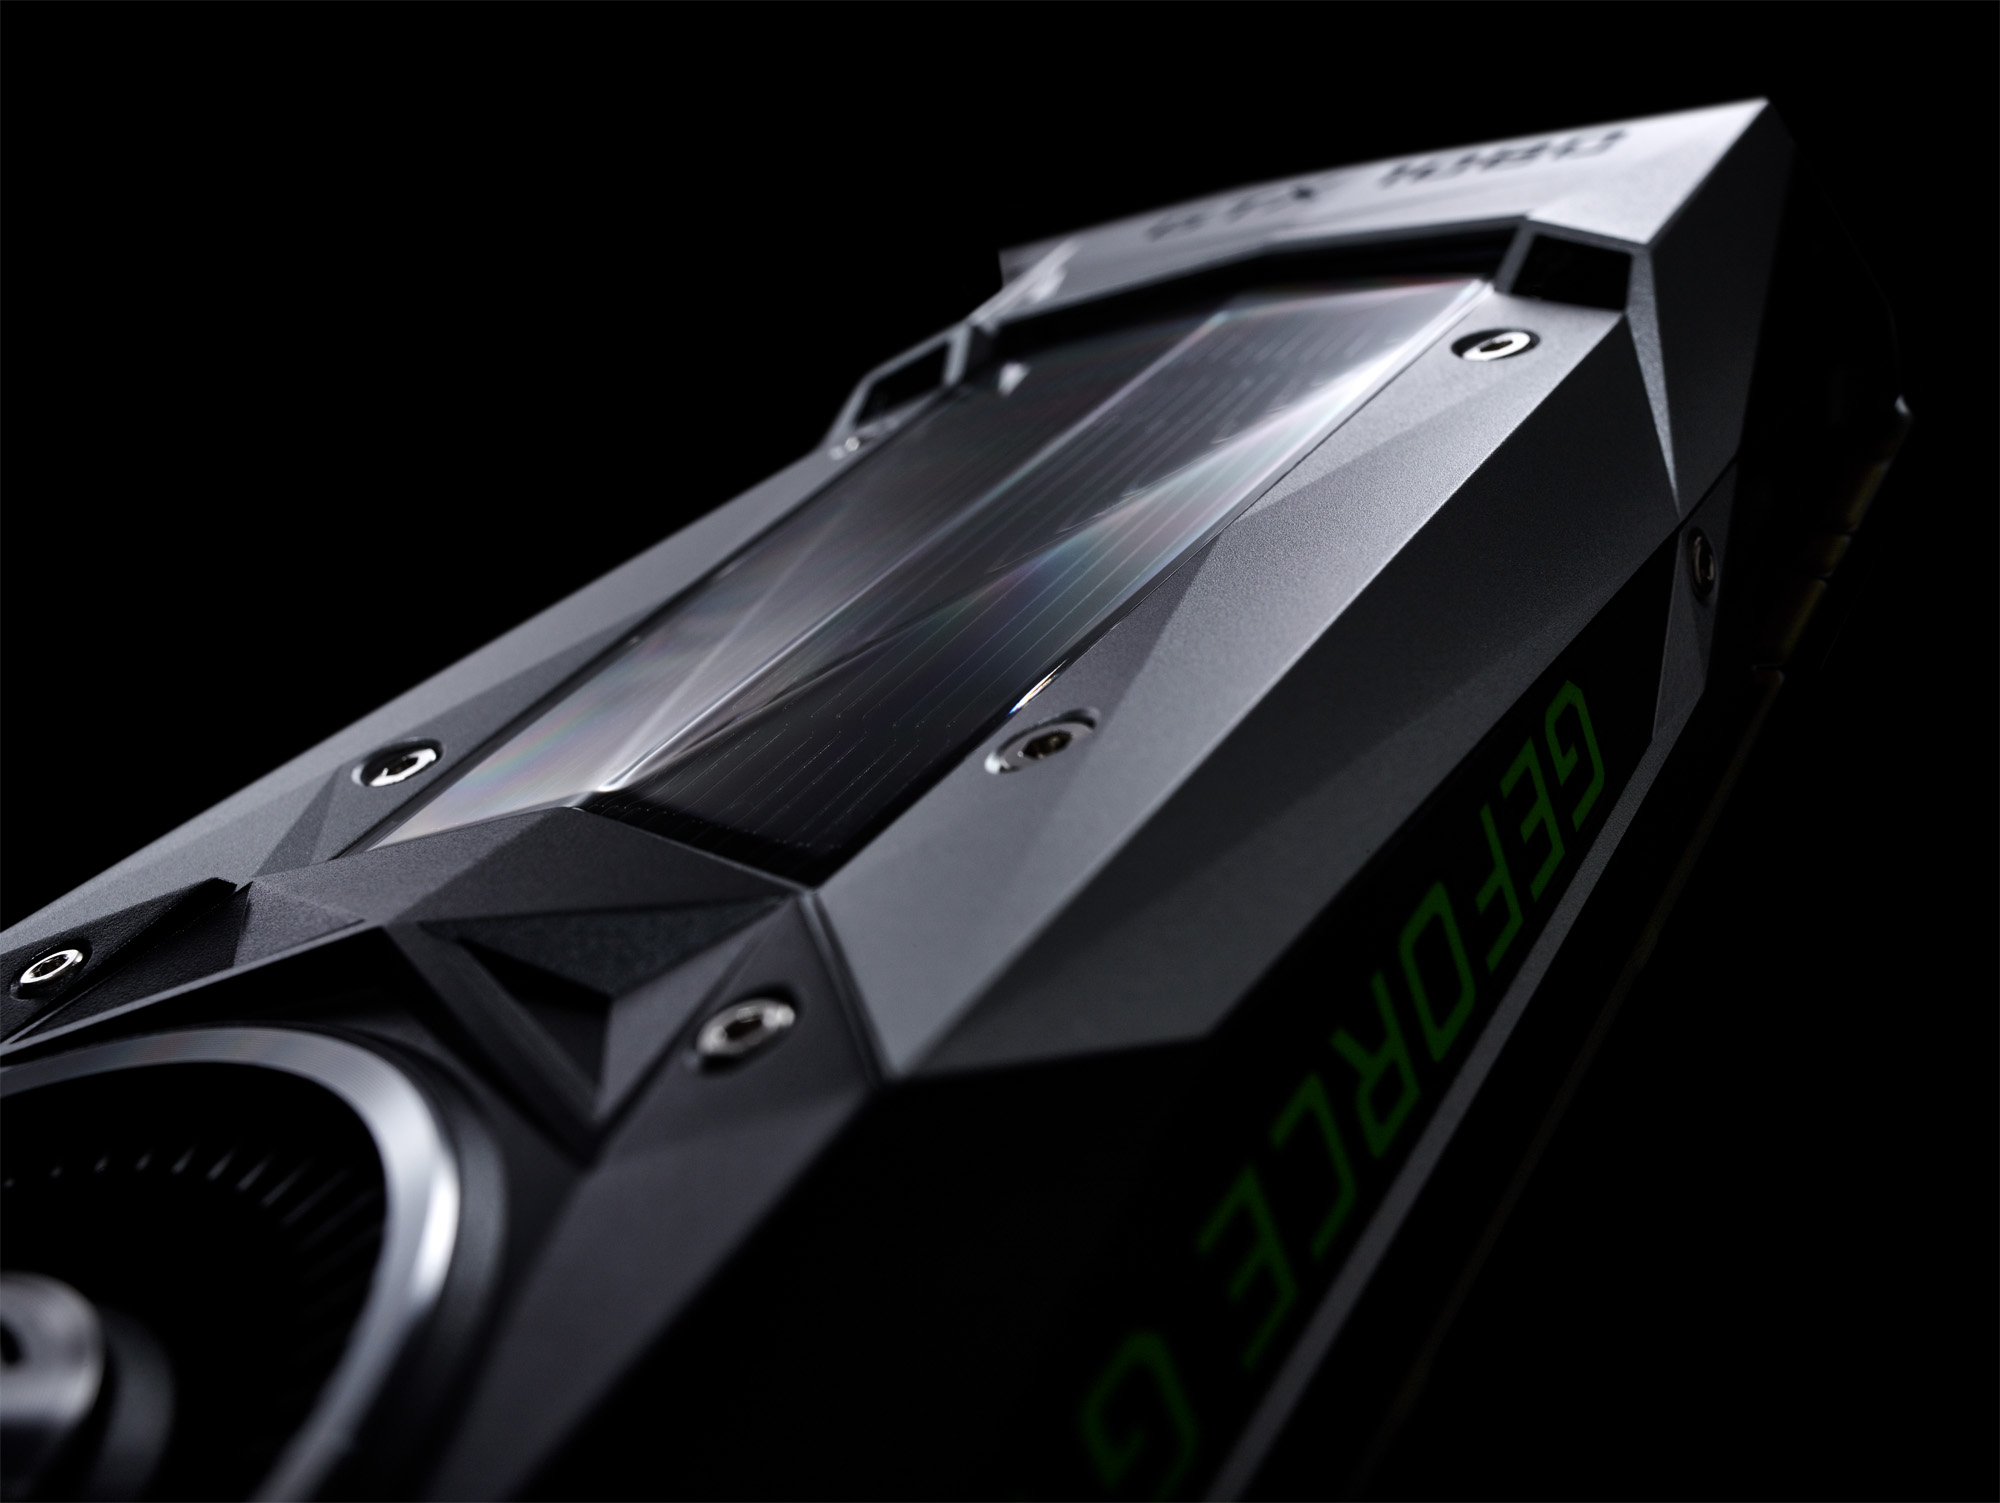
Today, NVIDIA CEO Jen-Hsun Huang revealed our highly-anticipated Pascal architecture and our new flagship GPU, the GeForce GTX 1080, the most advanced graphics card ever created. With game-changing performance, innovative technologies, and immersive, next-gen VR experiences, the GeForce GTX 1080 is gaming perfected.
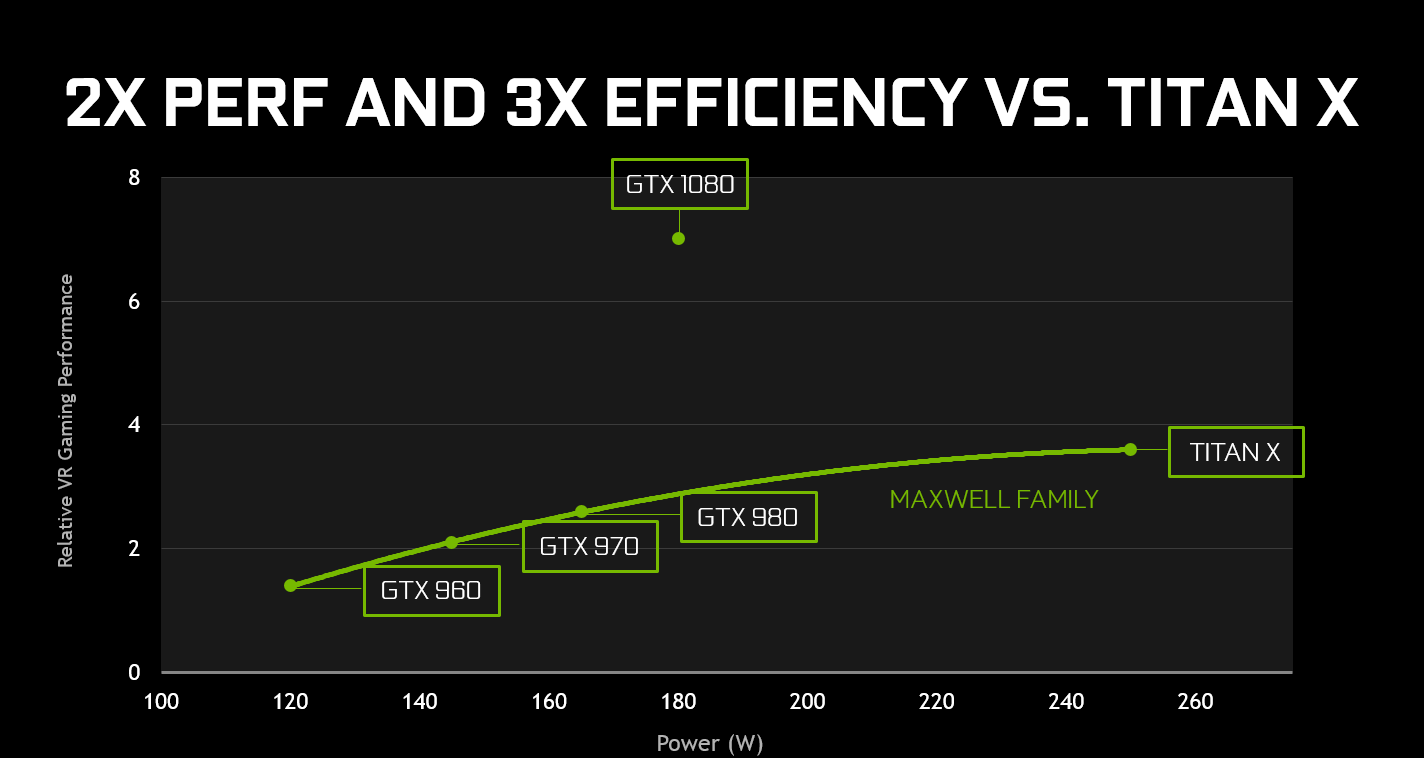
The GeForce GTX 1080 is a quantum leap in performance. Faster than both the GeForce GTX 980 Ti and GeForce GTX TITAN X, the GeForce GTX 1080 is built with the very latest technology to deliver unprecedented performance and efficiency, giving gamers the horsepower to play the newest games with settings maxed out. Whether they’re on your monitor or in Virtual Reality.
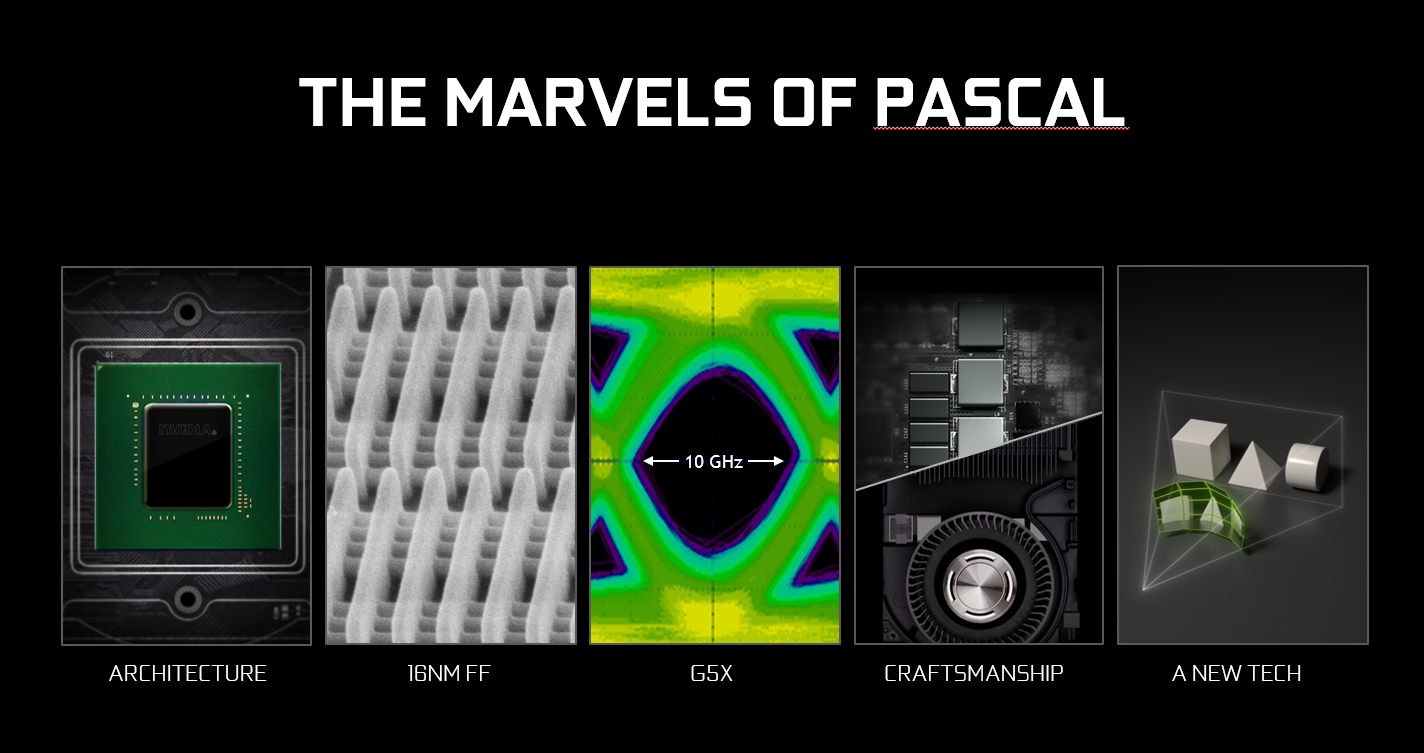
These gains in performance and power efficiency are enabled by the marvels of the Pascal architecture. The first of these marvels is the introduction of cutting-edge 16nm FinFET chip construction. This new, smaller chip design uses fewer Watts of power and emits less heat, enabling us to crank up the core clock speed of the GPU, which is key for increasing a graphics card's performance.
Alongside the GeForce GTX 1080’s powerful 16nm FinFET chip is 8GB of GDDR5X memory, a new, faster type of video card memory. This cutting-edge and blazing fast, High Bandwidth memory ensures performance won’t be bottlenecked by memory-related operations in the most demanding games.
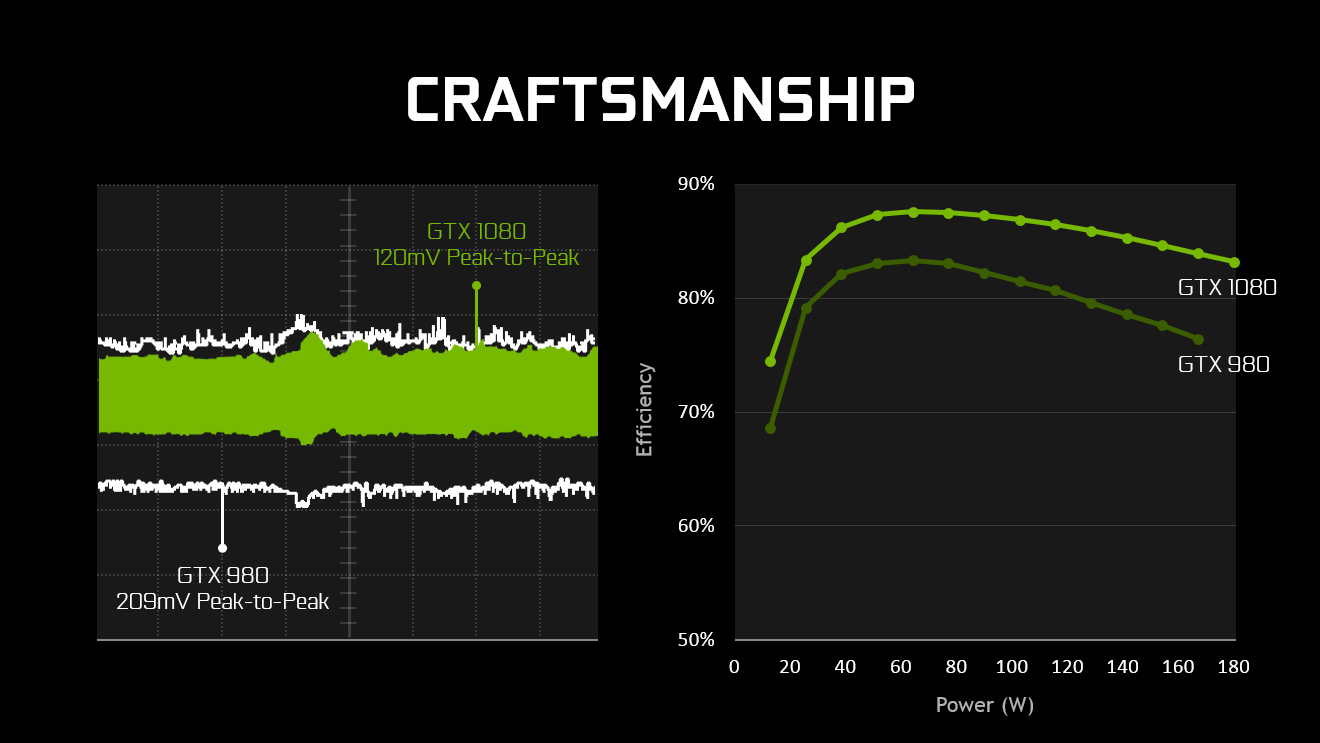
Surrounding the GeForce GTX 1080's powerful hardware is a redesigned vapor chamber and fan for cool, quiet operation; a polygonal shroud, and a backplate for the dissipation of heat from the rear of the graphics card. This premium design enables excellent overclocking and whisper-quiet operation, a trend we began with previous-generation NVIDIA GeForce GTX GPUs.
Under the hood, the new Pascal architecture is loaded with technologies that will make your games and experiences better, faster, and more beautiful. Previous-generation architectures have brought advances such as DSR, G-SYNC and HairWorks to life, and with Pascal we're introducing gamers to Ansel, Simultaneous Multi-Projection, VRWorks Audio, VR PhysX, and VR Touch.
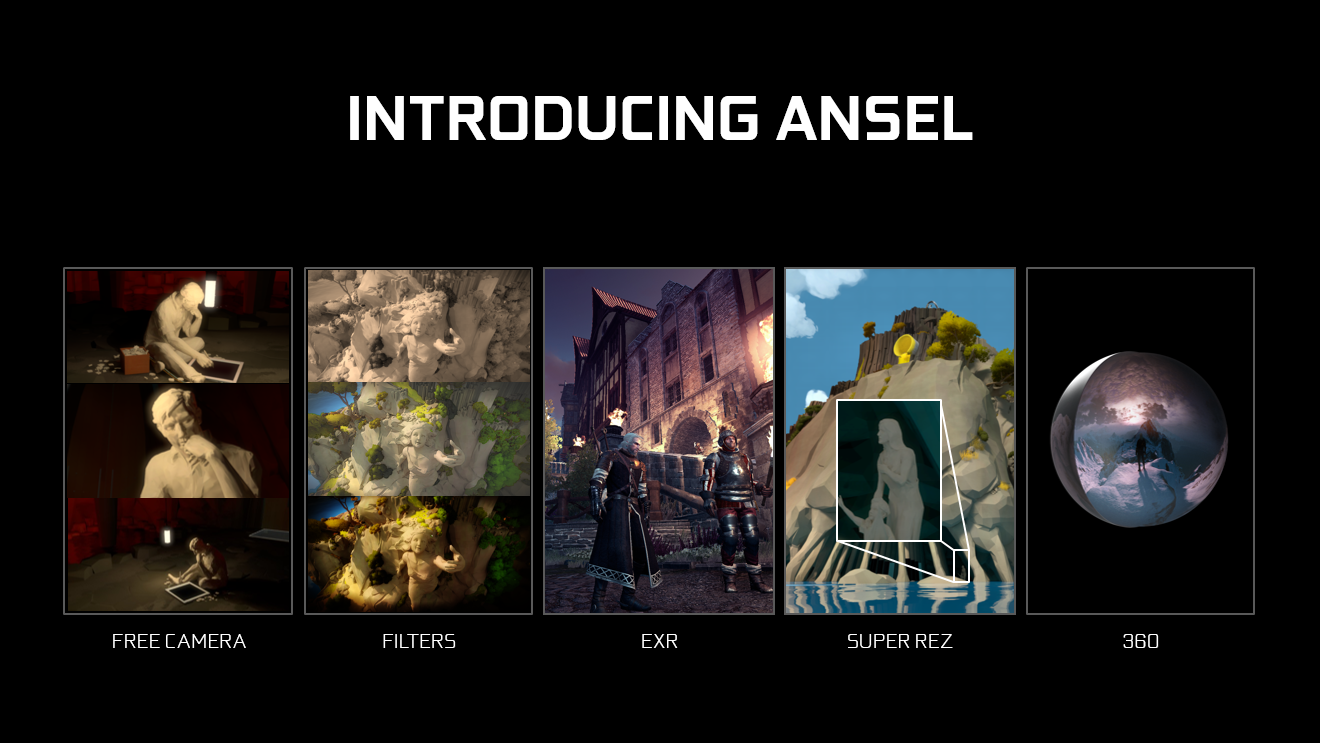
NVIDIA Ansel: Revolutionizing Game Capture For GeForce GTX Gamers
Game photography is undeniably a new art form - screenshots can be posed and framed, and those with a great eye will select the best scenes and most beautiful vistas, just as a real world photographer would. But unlike the real world where anyone with a good eye and a camera can start to snap stunning shots, high-quality game photography requires specialist tools, inside access to confidential game builds, and top notch hardware.
With NVIDIA Ansel we have overcome these barriers to enable GeForce GTX gamers to capture jaw-dropping screenshots from any angle using timestop and freecam controls. Apply filters, customize the framing and look of your shot, and snap in super high resolutions 32 times larger than your computer's display. Alternatively, capture 360-degree screens for Virtual Reality headsets, Google Cardboard, and desktop photospheres.
Learn more about NVIDIA Ansel and see Super Resolution, Virtual Reality, and 360-degree photosphere screenshots in our NVIDIA Ansel article and on our NVIDIA Ansel technology page.
Simultaneous Multi-Projection: Adapting The Image For Today's Displays
For decades PC gamers enthusiastically enjoyed their games on flat 4:3, 16:9 and 16:10 monitors. Thankfully technology has advanced, and we can now play with three monitors in NVIDIA Surround, on curved monitors, and even in Virtual Reality. With Simultaneous Multi-Projection we can improve your experience on these new displays, and in Virtual Reality improve performance too.
In a 3-monitor Surround configuration, gamers typically angle the left and right monitors towards them, so that they can see more in their peripheral vision and fit the monitors on their desk. But because games can’t account for this perspective shift, the in-game scene is rendered incorrectly, and the image is rendered incorrectly.
With Perspective Surround, enabled by Simultaneous Multi-Projection, GeForce GTX delivers a proper view of the world. By creating multiple view ports of the game world you’re playing in, we can project accurate views of the world onto each monitor, improving the view of the world and the level of immersion.
Simultaneous Multi-Projection also benefits Virtual Reality users through the creation of two new performance-enhancing and image quality-improving techniques. The first is Lens Matched Shading, which improves pixel shading performance by rendering more natively to the unique dimensions of VR display output. This avoids rendering many pixels that would otherwise be discarded before the image is output to the VR headset.
The second technique is Single Pass Stereo, which increases geometry performance by allowing the headset’s left and right display to share a single geometry pass. We’re effectively halving the workload of traditional VR rendering, which requires the GPU to draw geometry twice—once for the left eye, and once for the right eye.
To learn more about the VRWorks aspects of Simultaneous Multi-Projection, and how they improve VR experiences, check out our VRWorks article.
VRWorks: New Technologies To Improve Presence In Virtual Reality
The key to an immersive Virtual Reality experience is the feeling of being present in the game. Great graphics and realistic-looking worlds are particularly important for achieving this feeling of presence, and so to help developers add the required level of detail we've created the aforementioned Simultaneous Multi-Projection technologies.
But unlike a traditional game played on a monitor, Virtual Reality games allow players to reach and touch objects and surfaces, which adds a considerable amount of complexity for developers. To assist with challenges like this, we’ve brought our PhysX technology to VR.
With this technology embedded in a game, NVIDIA PhysX for VR detects when a hand controller interacts with a virtual object, and enables the game engine to provide a physically accurate visual and haptic response. It also models the physical behavior of the virtual world around the user so that all interactions - whether an explosion or a hand splashing through water - behave as if in the real world.
As well as enhancing your visual and physical experiences with PhysX for VR, we’re transforming the aural experience too, as audio can have a huge impact on presence in VR. Traditional VR audio provides an accurate 3D position of the sound source within a virtual environment. However, sound in the real world reflects more than just the location of the source. It’s changed by the physical environment as the waves move through walls and bounce off objects, creating echoes, reverberations, or muffled sound. We expect these subtle changes in real life, so their absence in virtual environments subtracts from the realism.
To solve this, NVIDIA has developed VRWorks Audio, our new path traced audio technology. Using, NVIDIA's OptiX ray tracing technology, we simulate the movement, or propagation, of sound within an environment, changing the sound in real-time based on the size, shape, and material properties of your virtual world--just as you'd experience in the real life.
Together, these VRWorks technologies enable us to better simulate reality across sight, sound, touch, and behavior, creating a more realistic and entertaining experience.
See for yourself in "NVIDIA VR Funhouse", our upcoming VR experience that incorporates VRWorks and NVIDIA GameWorks technologies.
The GeForce GTX 1080: The World's Fastest & Most Advanced Graphics Card
With the power of the Pascal architecture, the efficiency and performance of the 16nm FinFET GPU, the blistering speed of the GDDR5X VRAM, and the craftsmanship of the fan, vapor chamber, backplate, and shroud, the GeForce GTX 1080 is the world's fastest and most advanced graphics card.
If you want the best experiences, the fastest speeds, access to the new Simultaneous Multi-Projection and VRWorks technologies, Game Ready drivers, super smooth G-SYNC gaming, innovative software like Anseland GeForce Experience, and access to all of the other advancements we've created over the past 23 years, the GeForce GTX 1080 is the graphics card to get.
No other game in town can deliver the performance or feature set of the GeForce GTX 1080, the world's first 16nm FinFET, GDDR5X, Pascal-powered graphics card. Register your interest now to be notified about GeForce GTX 1080 availability.
GeForce GTX 1080 retail availability from the world's leading add-in card suppliers, including ASUS, Colorful, EVGA, Gainward, Galaxy, Gigabyte, Innovision 3D, MSI, Palit, PNY and Zotac, will begin at the end of May. Partner boards will vary by region, and pricing is expected to start at $599. If you want to try your hand at winning a GeForce GTX 1080, or even a custom gaming rig, test your puzzle-solving skills in our Order of 10 Challenge.
One more thing: the NVIDIA GeForce GTX 1070 is coming June 10th. Stay tuned to GeForce.com for further details.